
Photo from Gray's Anatomy
To the left is a muscular view of the hand. The muscles used in palming are the ones highlighted in yellow.


Foundations
I have received very good feedback on the depth of these insights, I trust you will enjoy them.
Foundational Contents (click on contents to go directly to the essays):
Many people will start their journey into coin magic with Bobo's Modern Coin Magic. "Bobo's" is quite extensive and if you are completely new to coin magic, you may not know what you should initially begin to study. While mastery of all the sleights and concealments contained within Bobo's is an admirable and worthwhile feat, there are definitely some that are more important to master early on, which will afford you the technical ability to perform quite a good number of routines.
This is a skeleton outline to help get you going, by no means will it make you a master of coin magic, but learning the following first off will get you set squarely in the right direction.
In 1948 Arthur Buckley's book Principles and Deceptions it is written on page 33, "From experience I have found that it is better at the beginning to become proficient in the sleight that one intends to use rather than divide the practice time on numerous sleights that will seldom, if ever, be used when mastered. This I find particularly so with coin sleights. Coins are more difficult to master than cards or any other small objects are to the same degree of proficiency."
With this in mind, I have focused in on sleights you would want to become proficient in that you want to master, to be able to perform a great number of routines.
I would recommend from the "Coin Concealments" section working on getting a solid classic palm, finger palm, and thumb palm, emphasis on the classic palm.
In the Basic Technique section, pay particular close attention to the Bobo Switch, Utility Switch, and Click Pass, all are very great ways and often used ways to switch coins while transferring from hand to hand.
As to the "Coin Vanishes" section: the ones I personally use regularly from Bobo's would be:
1. "The Standard Vanish" (Classic Palm vanish)
2. "Simple vanish" (usually to hold out a coin while dumping multiple coins into the other hand)
3. The thumb palm vanish (but not clipping it in fingers like Bobo's, just rest it on your index finger held there by your thumb and either use your index finger to push it along your thumb into thumb palm or bend the index finger as your hand turns down into thumb palm).
4. "A coin vanish" (this is a version of the "Retention vanish" explained further down this website)
5. "French Drop" (usually for spellbound routines or a one coin flurry)
Most of this vanishes are used inside a routine of some sort, but if you concentrate on those to start with, it will give you a good starting point to get into some nice routines.
Later on, you can start to concentrate on some back side of the hand concealments such as the back thumb palm, back palm, back clip, Tenkai pinch (called Goshman Pinch in Bobo's), Middle Finger back clip (not in Bobo's), and deep back clip (not in Bobo's). I would personally focus on the concealments and vanishes numbered above before studying the back side concealments.
The next question that is often asked, "If I want to buy a DVD or video to learn coin magic, what should I buy?" My answer to his question can be found here.
Good luck with the coins.
The Classic Palm is in my opinion, and I am sure shared by many a coin worker, the most important technique to master in coin magic. This one move alone allows for miracles with a coin.
The Classic Palm allows the magician to hold a coin in
their hand, while giving the appearance that the hand is empty. The fingers are
seen to move naturally and the hand can function quite normally, despite
concealing a coin.
|
Photo from Gray's Anatomy |
To the left is a muscular view of the hand. The muscles used in palming are the ones highlighted in yellow. |
|
|
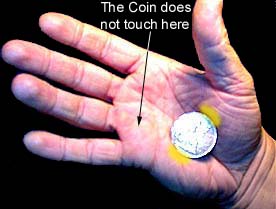
A coin that is to be classic palmed usually starts out in the fingertips in fingertip rest position. |
|
The coin is pressed up into the palm of the hand. The exposed view to the left is usually done with the palm pointing down (not up like this). Notice that the thumb and the pointer finger touch. This is good technique to keep your thumb from jutting out to the side telegraphing that you are palming a coin. |
|
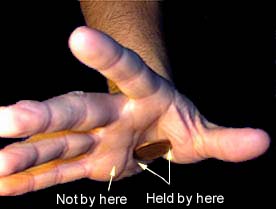
The coin is now held in classic palm. Notice which muscles are gripping the coin (highlighted in yellow). It is a side-to-side grip on the coin. Do not grip the coin where the arrow is pointing. If you hold the other edge of the coin where the arrow is pointing your hand takes on an arthritic look and your pinky and ring fingers are not able to move freely. |
|
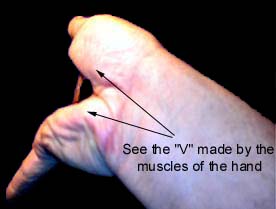
Here is a view of the hand pointed downward. You can see the "V" that your hand muscles make. The coin is held inside this "V" with proper muscle tension. You can clearly see the coin gripped by the left and right muscles (side-to-side). It will feel strange at first, but after constantly keeping a coin there during the normal course of a day, it will begin to feel very natural, and effortless. |
|
Here is a top view, again showing where the coin rests, and as stated above, it is not held by the muscle at the base of the fingers. See how all fingers can be stretched out normally? |
|
Here I gripped the coin very tightly. This is tighter than you normally hold the coin, but I wanted to exaggerate to show more clearly how the coin is being held. |
|
Here is a good view of the coin removed after I held it very tightly above. You can see the marks in my hand left by the coin. Again, this shows which muscles are holding the coin. |
After you learn to palm a coin, here is some more details on working with the classic palm:
 |
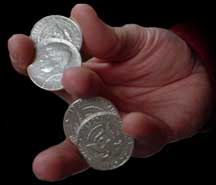
A little advice on palming multiple coins: To the left is an image of palming multiple coins fanned out to demonstrate that a coin can be palmed very deep in the hand (toward the wrist) or very shallow in the hand (toward the pointer finger). Some routines that involve stealing a coin with your fingers may be easier if you fan the coins as shown. Other routines that involve the controlled one by one release of a coin by relaxing the hand may be easier if you palm in a stack (not fanned). Slight relaxation of the muscles will cause a coin to fall free easier. I personally find it takes a little more muscle effort to hold a coin in deep classic palm, and tends to make my hand look slightly more strained. You should be able to palm deep, shallow, or in the middle of your palm so that in a fast paced routine, during a quick palm, you are not stuck if it does not hit your palm perfectly where you wanted it. You will be able to palm it anyway. |
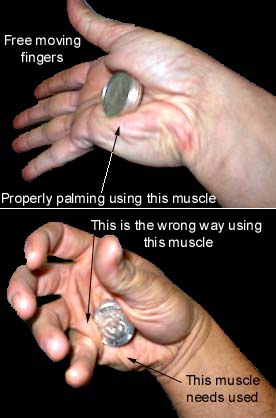 |
To the left the top
picture is 4 half dollars palmed in a stack at about mid classic
palm. This shows how the same information above with the single coin
still applies to palming multiple coins. The very same muscles are
used, the fingers are free to move.
To the left below I purposely palmed 4 half dollars improperly. See how my hand is cramped looking and cannot go flat. The muscle at the base of my ring and pinky fingers are holding the coins against my thumb muscle. This locks my pinky and ring finger from moving freely and gives me that arthritic cramped look. |
 |
One last note on palming from looking at the hand on the top side. With a coin in classic palm, if you stretch your fingers out there will ALWAYS be some "dimpling" in your hand where the arrow points, however, usually only a fellow magician knowing what to look for would be able pick it up. You can lessen the degree of "dimpling" by holding your hand with your fingers naturally curled in. Look at your hand right now as you read this. Your fingers will undoubtedly be curled to some degree. When performing at a table, when resting your hand on the table, keep in mind to keep the heel of your hand on the table, not floating un-naturally above the table top. |
Once you have learned the technique, it's time to practice it. The great thing about the classic palm is that you can practice it just about anywhere. The more you hold the coin in position, the more your hand will learn the correct pressure to apply to the coin. At first the coin will fall out of the palm quite often. But this reduces over time. With practice, you will be able to take a coin and move it into position very quickly, and smoothly. Don't aim for speed at first, as the last thing you want to do is practice the wrong method, to a point where it has become ingrained, and difficult to correct later.
After you acquire the ability to hold a coin in palm, what you want to do is concentrate on making your hand look natural. I did not post pictures of what this looks like because the best example is to look at your hand empty, then look at your hand with a coin in classic palm. You want the hand with a coin to look as much as it can to the hand without a coin. Good luck!
Some people have referenced David Roth's
ability to lay his hand completely flat against the table and wiggle his fingers
while a coin is in Classic Palm. I think David was doing this on his
videos to prove the point that the Classic Palm mechanics does absolutely nothing to impede ability to freely move your fingers, and you can actually lay your hand flat and still wiggle fingers.
I can do this quite well, but I have never used it personally in an actual routine.
When I lay my hand perfectly flat on the table when Classic Palming, I can actually trap skin between the coin and the table which basically allows me to completely relax my hand and
capture the coin. I just have to contract my palm muscles again to retain the coin as I lift my hand.
To see what this looks like HERE
is a short video clip of my hand flat against the table. (It's a 3 meg Quicktime .mov so give it a few seconds to load).
Below are images of a half dollar and a
dollar pressed against a piece of glass from underneath to show you what I am
talking about.


If you can get that pinch of skin trapped under the coin you can press your hand completely flat and retain the coin. In this position, I can't even force the coin to fall out of my
hand even if I hit the back side of my hand; it's completely trapped. With all that said, there is not really much of a practical purpose to
laying your hand flat on a table and wiggling your fingers that I am aware
of. Hands lay naturally with the fingers slightly curled while at a normal
rest.
The Retention Vanish is a very stunning vanish of a coin. It is not that technically demanding, however the timing of it does need to be acquired to perform it properly.
The principle behind the beauty of the Retention Vanish is called the "Persistence of Retinal Impressions". After seeing an object in a certain space, the mind holds the visual image of that object in that space, even after that space is covered. With the Retention Vanish, a coin is placed into a hand very clearly, and is stolen away at the last possible second. The eyes of the spectator clearly sees the coin in the hand, and the mind retains that visual image even after the hand closes.
The first place where the Retention Vanish was published was in THE ART OF MAGIC. It's origins are unknown, however the earliest magicians in print to have used it are the late Harry Stork and T.J. Crawford. Dai Vernon also published this vanish in GREATER MAGIC, as well as J.B. BOBO'S MODERN COIN MAGIC. David Roth made minor changes to it and also printed it in his book EXPERT COIN MAGIC where it was first given the name "The Retention Vanish"
Since then quite a few magicians have put the vanish in print or video, and there is multiple different handlings for it. The handling I delve into here is the way I personally use it, which is for the most part very similar to David Roth's handling.
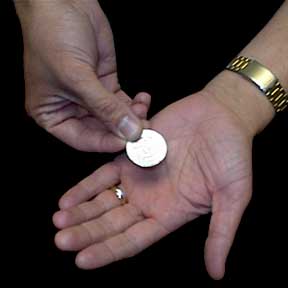 |
For this example, I hold the coin in the right hand, and will be placing it into the left. I typically approach the left hand showing the back side of the coin, then turn the coin over to the position shown in the picture directly below. This motion with a silver coin reflects a lot of light, and bolsters the Retinal Impression of the spectators. This vanish works best with shiny bright silver coins. |
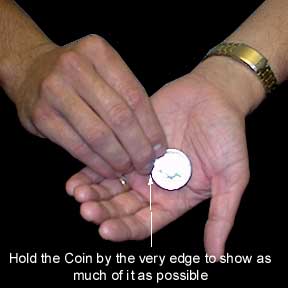 |
This is the position of the coin where you stop and hold it as the left hand starts to close. It is this view of the coin that will stay in the mind of the spectators. It is not actually laying against the hand, it is held slightly above it to allow for the rotating of the coin into fingertip rest position as shown in the next two pictures. The coin is held by just the tips of the fingers to show as much of the coin possible to the spectators. |
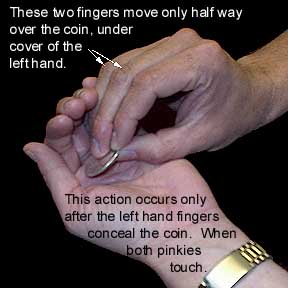 |
No movement of the right hand should occur until sufficient cover is provided by the left fingers which are closing. Sufficient cover is attained when the pinky fingers of both hands touch. After this occurs, the middle and ring fingers move slightly forward only to about the half way point of the coin. If you go too far, it will cause the knuckle on the pointer finger to pop up, thus telegraphing the move. |
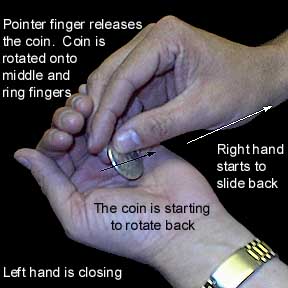 |
As you begin to move your right hand out to the right, the pointer finger releases the coin. The thumb holds the coin against the middle and ring fingers. The coin begins to rotate so that it will lay on the fingertip pad of the ring finger. To accomplish this your right hand has to pitch forward slightly so that the coin can come to rest on top of the fingertip. (You obviously cannot have your fingertip pointed down and hold a coin there). The slight pitch change of the right hand is covered by the greater motion of the hand moving to the right. |
 |
As the right hand exits from the left, it becomes apparent that the thumb is completely free. The coin is hidden from view resting on the fingertip pad of the right ring finger. The right pointer finger is about to exit the left hand. |
 |
Finally the hands are fully separated. The spectators just saw a coin held by the right pointer finger and thumb clearly placed into the left hand. The right hand was withdrawn with clearly empty thumb and pointer finger. |
This entire vanish should flow very smoothly, and only takes about one second to perform. The timing of the movements is essential. If the timing is not right, this vanish WILL NOT be convincing. The timing can only be acquired by practice.
Further subtleties after the hands separate. Drop the left hand slightly to "feel" the weight of the coin it is supposed to contain. Drop your right hand to the table or to your side. DO NOT CLASSIC PALM THE COIN at this time, the clinching action of the classic palm would be noticed at this point.
Make a crumbling motion with your left hand, and slowly allow your fingers to open to reveal the vanish.
Reserve the classic palming of the coin in the right hand for during a gesture as the left hand is being shown empty. When the left hand is opened it is providing a good moment of misdirection for the right hand classic palm, all eyes will be focused on the left hand.
This vanish is not really meant to stand alone by itself. It is best done within a routine. After the left hand is shown empty, it is natural for all attention to shift to your right hand. If you are not immediately doing something with your right hand in the continuance of a routine, it will create a moment where all the audience will be staring at your dirty hand. This is not what you want to occur. Think of the proper placement for this vanish, think beyond the vanish, make sure you are ready to flow directly into the rest of a routine to avoid the right hand suspicion. Even a wiped clean action from "The Magic of Michael Ammar" to show both hands empty will suffice to eliminate right hand suspicion. Good luck on the Retention Vanish.
I was hesitant to put the Muscle Pass in a section on fundamental coin sleights because of its difficulty. It is however a move coin magicians will try to acquire at one point in time, often to give up on it. I figured I would give my best shot at giving tips on how it worked for me, and at least it will show you how the pass works.
All the other sleights presented in this "foundations" section are learnable given the proper time to do so. I have come to find it is not the case with the muscle pass. Some will simply not be able to do this.
It depends on the size of your hand, the dryness of your hand, the size of the coin, and a prerequisite is a very strong classic palm. I cannot do it well with moist hands. I started with a half dollar and I can still shoot a half dollar higher than a silver dollar because the half is a lighter coin. When I went back to learn with a silver dollar, it felt like starting over from square one because the placement is different in my palm.
What is it?
It is a method to propel a coin from your palm. With enough force you can actually propel a coin vertical from a few inches to probably not much more than 2 feet. I personally average about a foot. I can't get 2 feet without slightly moving my hand up as I pass the coin (which is cheating).
Although the muscle pass pre-dates Arthur Buckley's PRINCIPLES AND DECEPTIONS (1948), I believe it is first found in print therein. It simply states:
"THE MUSCLE PASS WITH ONE SILVER DOLLAR
The success of this coin pass depends on your ability to palm a coin and then exert pressure by the thumb muscle to cause the coin to spring several inches from the palm without any visible movement of the hands that would cause the coin to spring and bridge the distance between the two hands several inches apart.
A coin, seemingly placed in the left hand but palmed in the right (see any of the methods described herein), is vanished, and the left hand shown empty, back and front. The right hand is moved up in front of the left. As the left hand is closed and turned over, the coin palmed in the right hand is sprung and caught by the left hand as it closes and turns over. A moment later the left hand is opened and the coin shown therein.
A very deceptive pass when properly carried out."
The oldest use of it is rumored to be with an English magician from the 1800's named Charles Bertram, though the move apparently pre-dates him.
Present day magician John Cornelius popularized the muscle pass with his routine "The Coin that Falls Up" on Michael Ammar's Classic Renditions #1 tape.
The below description is how the pass works for me personally and my observations on it. The descriptions assume using the right hand.
 |
Start out by getting a very solid classic palm of the
coin. I hold a half dollar deeper (a little more
toward the wrist) than shallow (toward the fingers) for the pass to work
better me.
I also let the edge of the coin that rests against the muscle at the base of my thumb to tilt up slightly higher than the opposite the opposite edge of the coin. The reason why is the edge of the coin that "pops" out of the hand is the edge on the thumb base. Having the coin slightly tilted up on that side makes sure it doesn't simply jam inside your palm and never move. |
 |
With a good solid classic palm grip on the coin, you
want to keep the left side of the coin locked into your hand muscle as
indicated in the picture. The lower thumb muscle starts to move
inward increasing the pressure on the coin.
Don't worry about making your hand look super natural like you are trying to secretly conceal a coin. It is very hard to look completely natural with the amount of pressure you will place on the coin. Simply keep your fingers and hand stationary. |
 |
As your lower thumb muscle exerts great pressure on the coin, the right side of the coin is allowed to quickly pop loose from the thumb muscle, while keeping the left side of the coin stationary on the left side muscle of the hand as indicated. The coin as shown here you will never actually see. It probably only holds that position for less than a hundredth of a second. |

|
The force of the coin that was popped loose from the thumb muscle causes the coin to rapidly jump forward out of the hand. The last part of the coin to leave your hand is the left side that never was allowed to slip or move. |
 |
This last picture shows that different coins may need very different positions in your hand to muscle pass. Shown to the left is the position I put a half dollar (more toward my wrist), and the position I put a silver dollar (more toward my fingers, and higher up on the thumb muscle). I can muscle pass the half dollar in the silver dollar position, but not as high. I cannot muscle pass the silver dollar very well in the half dollar position. |
Here is a video that I made to attempt to teach where I put a silver dollar, and what it looks like when I muscle pass it. At the end of the video I press the coin very lightly so you can see how the coin leaves my hand, without the coin flying completely away.
If you have a coin in your hand, you will see this is easier said than done. Many people will wrestle with this for hours with not so much as an inch of movement. Honestly it did not take me too long to be able to get it to fly out. BUT I never even knew about it or tried it until I already a good solid classic palm. In a short amount of time I was able to pop the coin, but I had no control over where it went and did not have much more than 3-4 inches in height. Practice enabled me to increase the height of it, as well as control the direction of the coin.
Another learning detriment is that it hurts to practice this pass. Because you exert a lot of pressure on the coin and you are letting the right side of the coin slide on your skin to pop out, this will cause your hand to get a little raw. I now have a thin callous on the right side of my palm which allows me to perform this painlessly. When I first decided to practice it, I could only do so for maybe 20 - 30 tries in a day until the hand calloused over. The callous actually allows the coin to pop easier since it is a harder smoother surface for the coin edge to slide on.
I have dry hands. This helps for this move. If your hands are too moist and slippery, it is just hard to get a good clean pop to propel the coin. More often the coin will just slide forward up the face of the thumb muscle and you don't get the pop you need. You may want to find ways to get your palms nice and dry to do this.
Well I hope this essay helps to understand what the muscle pass is, and how it can be done. I cannot guaranty it is something you will be able to learn, but if you are one who can, it is a fun utility sleight to have. It can be used within a quick impromptu one coin routine, and usually always causes a spectator to "ask to see that again."
Head to the Videos section to view a streaming video of the muscle pass.
The Four Coin Roll Down (The Split Roll-Out).
This is a very nice looking coin flourish attributed to Manuel can be found in J.B. Bobo's Modern Coin Magic as well as more recent videos/DVDs such as Michael Ammar's Easy to Master Money Miracles Vol. 2, David Roth's Expert Coin Magic Made Easy Vol. 20 or Ultimate Coin Magic DVD Vol. 4, Jeff McBride's World Class Manipulation Vol. 2.
In learning the roll down I had to pause the DVDs to watch frame by frame the finger positioning and read step by step Bobo's book to make sure I had the proper finger technique. If you do not get the coins and fingers aligned properly, the roll down will quickly become the four coin drop out. Followed by the four coin pick up off the floor.
There is some variation of technique to perform the roll down. The specific handling in Bobo's and Ammar's video is different than the David Roth handling. It looks very similar, but finger positions during the roll down are slightly different. I personally found the technique Roth teaches to give me better control over the coins.
What I have done is break down the moves into critical snapshots that you can follow step by step to learn the roll down. Pay close attention to the finger positions to succeed with this.
 |
Hold the stack of four coins with the 1st, 2nd, 3rd fingers and thumb. The 4th finger is not used at the start. I hold the coins behind the last knuckle of the 2nd and 3rd finger and in front of the last knuckle of the 1st finger. |
 |
Bring the thumb down to touch the 3rd finger as shown. The thumb tip rests on the rear two coins of the stack. |
 |
With the thumb tip, break the rear two coins away and push them forward on the 1st finger. The rear (top) stack is now held only by the thumb and 1st finger. The forward (bottom) stack is held primarily by the 1st and 3rd finger. The 2nd finger could move away at this point (I did this in the photo to illustrate the point), but there is no reason to do so. Keep it touching the stack. The 4th finger is pulled up toward the hand. |
 |
The 4th finger reaches over and touches the 1st finger in preparation for a grip change on the forward (bottom) stack. |
 |
The 1st finger pulls away from the forward (bottom) stack leaving the forward (bottom) stack now held by the 3rd and 4th finger. This grip change frees up the 2nd finger as shown. |
 |
The 2nd finger pulls in toward the hand as shown. |
 |
The 2nd finger is placed to rest on the forward (bottom) stack against the 4th finger, and the thumb rolls its stack inward so that the thumb also touches the 2nd finger. |
 |
The 2nd finger contacts the forward coin
of the top stack and the rear coin of the bottom stack. The thumb
touches the rear coin of the top stack, and the 4th finger touches the
forward coin of the bottom stack.
|
 |
Spread the coins apart so they do not touch. Now if you are good... reverse the roll down back into a stack! |
Here is a quick Windows Media Stream video of what it looks like up to speed: Roll Down Clip
What
Gaffed Coins Should I Get?
To
answer, I will break this essay down into 7 topics:
If
your question is what type of gaffs to choose, meaning a flipper coin, or a
shell, or a copper silver brass set, etc. My
advice here is to buy what you will use. Personally,
I usually buy a set of coins because I have an intended use for the set.
The routine comes before the coin set for me, not the other way around.
The routine may or may not be my own invention.
I may come up with an idea that will necessitate a certain set of coins,
or I may watch a new DVD that has a routine that I particularly like.
If I do not have the coins for it, I may buy them.
I
cannot answer for you in this essay what type of gaffs to buy.
You have to decide what you want to do with them.
With
that said, I believe the two most versatile coin gaffs are a shell with 4-5
matching coins and a copper/silver coin that matches your silvers with a couple
matching copper coins. Many
routines can be created with those two gaffed coins and their matching un-gaffed
counterparts.
2. What
size coins?
The
simple answer is to use the size that feels best in your hands.
Other than that, there are a few considerations:
Most
commonly available gaffed coins are made out of half dollar size coins.
There are some items that are made with quarters such as shells and
folding quarters. Custom coin
gaffers tend to be the place where you would need to purchase silver dollar size
gaffed coins.
I
prefer to use dollar size coins for magic that happens at chest level where
coins are displayed at the fingertips. Coin
flurries, multiple coin vanish/reproduction sequences, Three Fly routines, all
apply. Larger coins are also easier
to see when performing for a larger crowd of people.
Some moves are easier with dollar coins such as adding a coin from
Fingerpalm to a fan of coins at the fingertips.
For
closer more intimate coin routines for spectators who are close in proximity, I
prefer to use half dollar sized coins. This
size coin is easier to hide concealments such as the back clip.
I also like to perform routines that put the coins in the hands of the
spectator during the routine. Someone
with very small hands may not be able to close their hands over large dollar
size coins very well.
I
reserve quarters for truly impromptu routines, where I need to borrow common
currency. (Assuming you live in the
3. Silver versus clad?
Before
I can address question, “Do I need custom crafted gaffed coins?” I
need to describe various characteristics of coins available.
We
tend to refer to coins minted in the
The
Coinage Act of 1965 authorized the replacement of the 90% silver alloy coins
with a copper-nickel clad composition for the quarter, and reduced the half
dollar silver content to 40 percent. In
1971, the silver content was completely removed from the half dollar.
This Act was the result of a booming
US
quarters and half-dollars in circulation today are all "clad" coins,
produced from three coin strips that are bonded together and rolled to the
required thickness. The face of these coins is 75% copper and 25% nickel and the
core, which is visible along the edges of the coins, is composed of pure copper.
So
what is the difference? Silver coins
have a brighter silver look to them, and a distinctive “ring” to them when
they are hit together. Clad coins
have a darker look and more of a “clinky” sound to them.
Silver is also a softer metal than nickel.
Over time, the faces on old silver coins can wear down and become very
smooth, creating what are referred to as “Soft Coins”.
(Which I will discuss in the next section).
All
mass produced gaff coins tend to be made with clad half dollars and typically
copper English pennies. Some use
copper Mexican Centavos, and a variety of custom made Chinese replica coins.
If
you have a desire to obtain a gaffed coin set using silver coins or coins other
than those listed above, you typically will need to contact a custom coin
gaffer.
4. What are soft coins?
“Soft
coins” are coins that have had the relief on the faces of the coin rubbed down
naturally over time, or artificially via sandpaper or wet stone.
They have the characteristic of being able to silently slide over the
faces of other soft coins.
The
benefit is that a stack of two or more soft coins can be manipulated silently by
a magician. Single coins can be
produced or vanished by sliding them on or off a coin stack hidden in the
magician’s hand. It eliminates the
“grating” sound that would otherwise occur when you rub two coins against
each other.
Coin
shops call these coins “culls” or “junk silver”.
Usually the coins are melted down for their silver content.
Coin shops will sell them for their silver value.
Soft
coins are a desirable attribute for certain routines, but reasons why you may
not want soft coins are:
1. Soft coins tend to have less of a polished luster to them due to natural aging. If you like bright shiny coins, you may not want soft coins.
2.
Soft coins may not all be uniform
in appearance. They may have
different levels of wear and or aged appearance to them.
They are harder to match.
3.
Related to #2, it is often harder
to get soft coins that match in appearance and also have dates that match if
this is important to you.
4.
Soft coins tend to have worn edges
which may make certain coin palm concealments more difficult.
5.
Since they are harder to obtain,
match, and machine, they may cost more to have gaffed.
One
last alternative is to have coins artificially softened and aged.
This will give you uniform look, dates, edges, etc.
Since this also requires more labor, it usually will also cost more than
just getting regular coins.
5. What
is re-edging?
Re-edging
is usually done in conjunction with cutting down the diameter of a coin that
originally had a milled (tiny gnarled lines) edge.
For example: A US Kennedy
half dollar. If a coin gaffer
reduces the diameter of a coin, the edge is cut away.
A special machining tool is used to put the milling back on the edges of
the coin.
The
benefit of the re-edge is that it is new and crisp.
It often makes palming or gripping the coins by their edges easier.
The down side is that a fresh brand new edge on an old soft coin may look
somewhat out of place. In my
experience, people don’t really notice.
6. Should
I get an expanded shell set or unexpanded shell set?
An
expanded shell is created by slightly flattening the coin so that its diameter
is increased. Then one side is
machined out to create the shell. Expanded
shells are meant to fit over top of regular coins of its type.
An
unexpanded shell does not go through the flattening procedure to increase its
diameter. One side of a regular coin
is machined out to create the shell. Unexpanded
shells are meant to be used with coins that have been cut down in diameter and
re-edged.
The
benefit of the unexpanded shell is that it covers coins that have been machined
specifically for the shell. Because
cut down and re-edged coins are all the exact same diameter, and are perfectly
round, an unexpanded shell fits them perfectly.
Unexpanded shells also tend to cover more of the edges of the re-edged
coins because they have not been flattened.
The expanded shell can have slight flattening of the coin features from the process of expanding, and slightly shallower edges. Since it is used over regular coins which can have minor variances in diameter, it may not fit as well as unexpanded with re-edged coins. If you get really good matching coins, this issue is not really a major deal.
One
negative of the unexpanded set is that if you lose one of your coins, you can't
just replace it with another; you need to get another re-edged coin made.
An unexpanded shell set typically costs more because every coin in the
set has to be machined.
I
have been asked if an expanded shell set versus an unexpanded shell set
“looks” more deceptive than the other.
The
fact is, whether you are using an expanded over regular coins, or an unexpanded
over cut down coins, the shell is always going to be slightly larger in diameter
than the coins you are covering with it. In
both cases if you were to stare at the coins and look for the bigger coin, you
will be able to find it. But for all
practical purposes, this is never done. A
well made expanded shell covering properly fit coins is just as deceptive as an
unexpanded shell set.
7. Do
I need custom crafted gaffed coins?
If
you do not care if the coins are silver versus clad, my recommendation is find a
magic shop that carries Johnson Products coin gaffs.
They have a very good reputation for making quality mass produced gaff
coins.
If
you have a particular need for silver, or a specific type of coin, or you want
unexpanded shells, soft coins, re-edged, silver dollar size, etc.
Chances are you will need custom crafted gaff coins.
See the Links section of this website for the
websites of two custom coin makers I have purchased from who do exceptional
work.